AAR – Battle of Brabant-sur-Meuse

Graham and I have completed our iteration of the Valmy campaign with victory going to Graham. It was a very interesting exercise and will help with ironing out how we are going to run the other campaigns of the wars.

We completed our instance of the Valmy campaign first and I have three other instances involving 6 other games at various stages of completion.  Consequently, I can’t offer a complete commentary on the campaign which will follow in the next week or so as the others reach completion.

Suffice it to say that Graham and I came to blows on the east side of the Meuse just north of Verdun. Graham (playing the Duke of Brunswick) was heading south along the river with the coalition army and I (playing Dumouriez) commanded the French blocking his path.

Here is the battle scenario that I had pulled together.  Scenario

Here is a map of the battlefield:

A map of the battle.

A map of the battle.

Graham (Brunswick) loaded his right flank with high quality grenadiers supported by massed batteries near the middle of the field.  His left comprised regular Austrians and Hessians and a sprinkling of Prussian units.  The French (me) had deployed defending the line of hills across the field.

Initial setup looking west to east.  French are on the right and Prussians on the left. You can see a major Prussian force near the village closest the camera, it would go on to win the game for him. Im using 15mm figures on 60mm sabots while rebasing my 6mm figures.  The whole battle is a bit

Initial setup looking west to east. French are on the right and Prussians on the left. 
You can see a major Prussian force near the village closest the camera, it would go on to win the game for him. I’m using 15mm figures on 60mm sabots while rebasing my 6mm figures. The whole battle is a bit “pulled together.” I should be using green paper for labels.

Brunswick began aggressively committing his troops to heavy combat without sufficient preparation and paid the price with a sharp repulse.  Realising it would take more than a simple advance to drive the French from the field he began preparations for a second attack. – Basically, Graham took his firepower heavy troops and charged them into mine without stopping to fire.  He took a bit of a shellacking from my fire and was repulsed with a loss or two all along the line.  Sadly, he wised up and started shooting me to pieces.

The Prussian line nearest the camera has just been repulsed after charging in along the line.  Further away from the camera you can see the French have held off the Prussian advance.

The Prussian line nearest the camera has just been repulsed after charging in along the line. Further away from the camera you can see the French have held off the Prussian advance.

Rather than sit back and await piecemeal destruction, the French advanced to contact and brought pressure to bear on the flank furthest from the river. They were successful in blunting the Austrians and Hessians. The advance of the second line of Prussians stabilised the situation for Brunswick. – I had to do something and made some headway on my right flank.

Meantime, at Brabant and on the river the Prussians recovered to make steady headway despite their initial setback. Finally, about midday, the time was right to launch the Prussian reserve and two brigades of Prussian grenadiers broke the French line and captured Brabant. – sigh.

The end result.  No French left around Brabant. Further away from the camera you can see the French defenders have been thinned out.

The end result. No French left around Brabant. Further away from the camera you can see the French defenders have been severely thinned out.

This was the end of the battle as I had broken under the Bluecher ruleset.  A good win to Graham and useful in ironing out a few misunderstandings about rule mechanics.

Blücher Basing

Well, Valmy continues apace. One instance is about to fight the battle that will decide the campaign.  Another will be at that stage by the end of the week.  The final two are not so far along.

In the meantime I’ve been progressing my basing.  You can view my earlier post here.

I’d previously posted that there was some discussion about 60mm vs 75mm bases, but we’ve settled on 60mm base width.  This means I can use two 60x30mm bases on a sabot.  As a consequence, I can use the troops for both Polemos napoleonic rulesets, Volley and Bayonet: Path to Glory and Blücher.

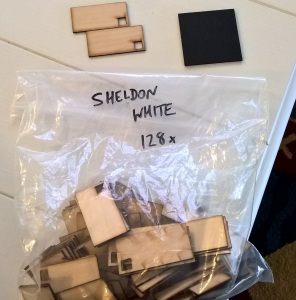
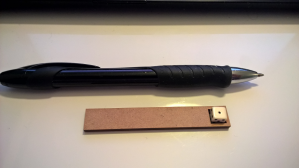
Here are the raw bases from (Olympian Games), 60×30 with an 8mm square hole to accommodate a 7mm die to record Blücher elan:

Raw bases

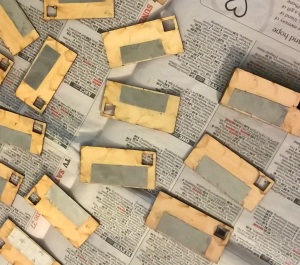
Here I’ve glued strips of steel (not stainless) to the bases so they will stick to the magnetic sheet on the sabot:

Metal Strip

I then sprayed the bases grey, glued on the figures, painted the information strip (the rear centimetre) green and flocked. I cut a corner out of the sabot magnetic sheet to accommodate the die and painted the corner green.

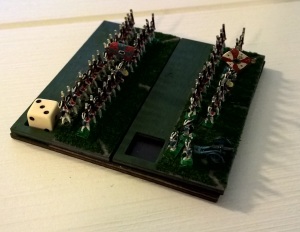
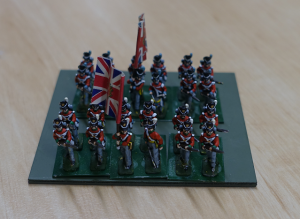
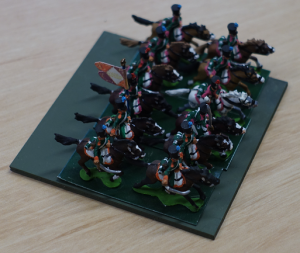
Here is a 60mm square sabot with troops (my Prussians of 1806) attached:


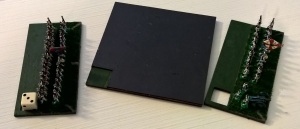
On Sabot 2 On SabotHere it is disassembled:

Off Sabot

As you can see, I have kept the game mechanic marks (45 degree corners and centre mark) subtle so they won’t intrude. If you look for them you can see them, but otherwise you would miss them.  Likewise, the trait or book-keeping strips I place at the back will be green rather than a glaring purple, red or white.  I have a supply of different coloured dice to mark different corps.

Another instance up and going

Two more players have come forward from my group so I’ve kicked off another instance of the Valmy Campaign.  Four going at once now 🙂 One campaign has come to a climax and the deciding battle will be fought on the 18th or 19th of September 1792. Another campaign is up to the 14th of September. The remaining two are yet to issue first orders.

Valmy Update 1

I have two instances of the campaign running and I am participating in one of those. A third instance will begin when Peter and Greg return from Waterloo. I won’t be posting anything here until that third instance has moved along sufficiently that it won’t be affected by reading how the other campaigns went. I will then post the campaign briefing, map, a narrative of the campaign, and an after action report of the tabletop battles.

I have to say, the miniature campaigns have repaid the effort to get them up and going already, and none of them have yet made the table. Obviously, that’s only my view but I’ll post honest player feedback here too.

Some pretty interesting things are happening in both campaigns.  One is up to the 15th of September 1792 (the Battle of Valmy occurred on 20 September 1792) and the other is up to the 13th. We are very close to a battle in one campaign, and the other is so bizarre I’m not sure how it will unfold.

And they’re off…

Well, we are up and going.  I will alter the menu structure of the site to add some pages to store the results.  Unfortunately, I can’t post anything here yet as it will give away to much information. In a couple of weeks I should be able to post some progress.

Kicking off Valmy

The game has arrived and I have had a look. It’s a bit “impressionistic” in terms of the campaign so I’ll be making some changes to the game. I’ll be adding in some forces and changing some arrival times to better reflect the campaign as I see it.

It has been a while since my last post. That’s because I don’t want to go into too much detail about changes I’ll be making or how the game will run. The trouble is that the campaign participants read the blog. Sadly, that means you’ll have to get used to being a little behind the times.

The biggest changes will be the addition of some Austrian and French reserve forces (it’s only about 10-15k troops each) and changing the arrival times of some of the French forces (which all seem to start on the board).

One thing the game has done is to convince me that it will play better with only one player per side. I had originally thought I would run with two on the French side. I’m no longer sure that will work so we will go with just one player per side.

I’ve had five volunteers to play (Peter, Greg, Tony, Graham and Simon) so that means I’ll run three instances of the campaign in three pairs facing off (I’ll be the sixth player). Peter and Greg can play against each other when they return from Waterloo.

As you can see, I’ll be participating in one of the match-ups. That means I’ll need a very non-discretionary framework for running the campaign to ensure it is fair. I could ask one of the other players to run the campaign I will be in, but I did want to run them simultaneously and don’t want participants peering into the guts of the campaign framework at this stage.

I’ve added a “Campaigns” Menu item above. I will record progress of the campaign there. You also find I added a place to record player performance and history across the many campaigns we’ll be running. Participants have been asked to give me some material to include in a narrative of each campaign.  Finally, I’ll make sure that enough information is posted to allow others to duplicate our approach.

Valmy has arrived

The Valmy Campaign: The Revolution Saved, 1792 AD has arrived. You can check it out here.

This means I’m set to go. With two of our number on their way to Waterloo and a couple of other people missing tonight I will do the preparation work to begin the campaign.

New bases

Dean’s (of Olympian Games) bases arrived. I have ordered enough to do a few mock-ups to see how they’ll turn out. The base turnaround was very quick and Dean suggested cut-out sabots to layer over his thin bases. He will be able to do dice frames for me. In fact he’s given me a couple of dice frames to experiment with. I got a 6mm dice frame and 8mm dice frame to accommodate 5mm and 7mm dice respectively.

His advice was to do fairly thick dice frames to hold the dice securely. That’s sensible enough, but I think I’ll go with poster putty (Blu Tack) to reinforce gravity and friction. That means I can keep the overall base thickness down. You can see a dice frame below:

DF 6mm 75mm

6mm on 75mm (3″) base. Dice frame at the rear.

I had to search them out but I found some 5mm dice in the flesh. Gak! They’re tiny. In fact, they’re so small that I’ve abandoned them as an option. I’ve order some 7mm dice to have a look at. The smallest I have are 9mm and too big for the dice frames.

In terms of the bases my first impression is that 6mm and 15mm figures look pretty good on 75mm bases. Certainly, Napoleon’s Battles size infantry bases will look very good saboted onto this size. On the other hand 60mm looks a little crowded as the figures go right to the edge. Finally, 50mm is real squeeze. See below:

15mm 75mm

15mm on 75mm (3″) base.

15mm cavalry on the same base.

15mm cavalry on the same base.

15mm infantry on a 60mm base.

15mm infantry on a 60mm base.

15mm infantry on a 50mm (2

15mm infantry on a 50mm (2″) base.

My Heroics & Ros 6mm figures look very small on the 75mm bases particularly (as above). In terms of other sizes, see below:

6mm infantry on a 60mm base.

6mm infantry on a 60mm base.  Rear battalion in focus and depth of field wrong.  Sigh.

6mm cavalry on 75mm (3

6mm cavalry on 75mm (3″) base.

6mm cavalry on a 60mm base.

6mm cavalry on a 60mm base.

6mm cavalry on a 50mm  (2

6mm cavalry on a 50mm (2″) base.

The thing to test is smaller base sizes to sabot on to large 60-75mm bases. 15mm cavalry are going to struggle to fit on 30x20mm bases but infantry are fine. Smaller bases at 20 by 20mm are just unworkable for 15mm and would give an odd, clumpy look to 6mm.

15mm figures looked pretty good on a 60 by 30mm base.  20mm is too shallow for 15mm cavalry.

15mm infantry on a 60 by 30mm base.  Obviously, 6mm will fit well too.

15mm infantry on a 60 by 30mm base. Obviously, 6mm will fit well too.

15mm cavalry fit fine for depth on a 60 by 30mm base.

15mm cavalry fit fine for depth on a 60 by 30mm base. You can fit 6 figures.

Another problem is how magnets on bases behave when like poles repel each other. Magnetic sheet on the sabot makes sense, but I think I’ll go with shim steel under the smaller bases to avoid the repulsors effect.

Shim Steel 0.05mm

Shim Steel 0.05mm. You can see a test corner clip done with nail scissors. Yep, easy to work with.

I also found some old Napoleon’s Battles movement trays in both 3″ and 2″ size.  As you saw above, I’m not actually sure I want to go with 2″ bases.

Napoleon's Battles movement trays.

Napoleon’s Battles movement trays.

I showed these bases to some of the boys on Monday night. There was some discussion about the large number of 6mm figures we have access to. We have enough 6mm figures to fight the Battle of Dresden at 1:33 figure scale. That should be enough! In terms of 15mm we’ll have 6-7,000 figures which is also a substantial number.

There was also some discussion about how to use 6mm and 15 mm figures. I think the consensus was to place the 6mm figures on the 75mm bases to maximise the diorama potential. We should then be able to use models to signify unit traits (such as skirmish and firepower). We can use the 15mm figures on smaller bases for the larger battles as you don’t lose any diorama potential (because there isn’t any; they just fill the base) by shrinking the base width. They are always going to need rosters or labels anyway.

I’m not sure I agree, but that’s the nature of consensus. I think I’d go 60mm for the 6mm because if we are going to refight Bautzen, Leipzig or Dresden with anything, it will be with them since we don’t have the right 15mm figures for that.  For those battles we’ll definitely need smaller base widths. We can always place the 60mm base on a 75mm (3″) sabot.